


In this article we’re gonna run Jenkins from scratch in a docker container. Then we’re gonna create a multi branch pipeline and connected with a git repository.
During this step I will also explain how to create different types of credentials in Jenkins. And finally I will show you the basics of a Jenkins file to configure this multibranch pipeline.
Run Jenkins in Docker Container

So step one is to run Jenkins in a docker container so to use that we need to find an official image for Jenkins. Lets go on hub.docker.com.

Search for “Jenkins” as you see here Jenkins results in an official image and some other images. And if you click on that image the official image has been deprecated.

The last version is 2.60 which is very old Jenkins version.

Instead of it we’re gonna use this image here. So on my command line I’m gonna execute docker run using this image.
Initialize Jenkins and install default plugins

The first part I’m gonna expose is port 8080 the Jenkins application inside container will run port 8080 because Jenkins runs on Tomcat. Which by default starts at this port and I’m gonna bind it to my hosts port 8080.
Another port we can expose is 50,000 which is basically a port where drink is master and slave communicate. So this will enable my Jenkins to find slaves in case I had some so the ports are open.
Now another thing I’m gonna do is I’m gonna run it in detach mode “-d”. And I’m also gonna bind volumes to it so to do that I’m gonna use “-v”.
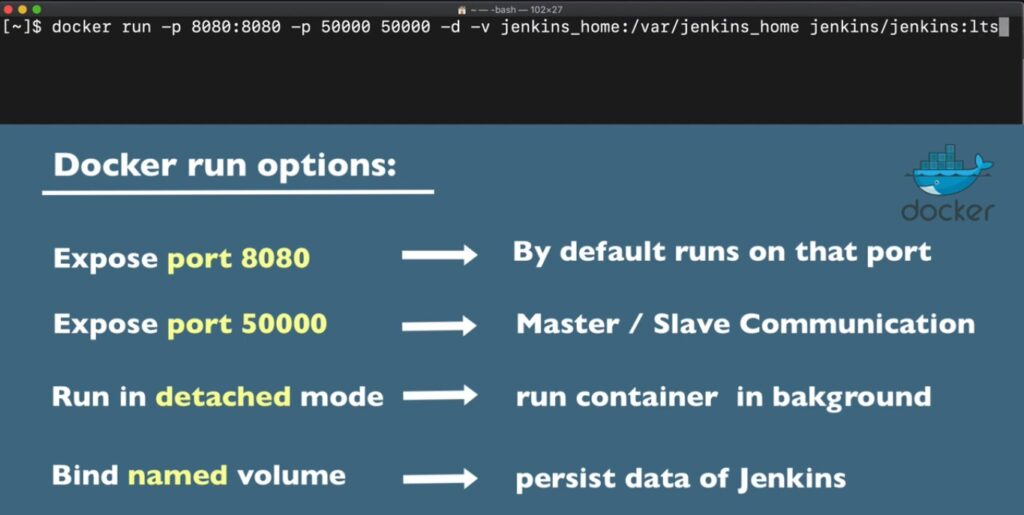
And I’m gonna use a named volume which I’m gonna call Jenkins home meaning I don’t have to have this as a folder it’s gonna be automatically created. I’m gonna bind it to directory inside Jenkins container.
"jenkins_home:/var/jenkins_home"It’s inside of docker container and this will create automatically create a volume now. The reason why we need to create a volume for Jenkins is to have data persist for Jenkins. So when we remove the container, restarted and recreated the data will still be there.
And the reason why we need to persist this data is because all the Jenkins builds all the configuration. And all the Jenkins plugins and also Jenkins users will be stored there. So without this data you will basically have to reinitialize the whole Jenkins.
Final Command for Run Jenkins in Docker Container
docker run -p 8080:8080 -p 50000:50000 -d -v jenkins_home:/var/jenkins_home jenkins/jenkins:ltsI’m gonna run this command and it’s pulling the image from the docker hub it’s gonna start in just couple of seconds.

So the image has been pulled and the docker container must be running already. If I use this commands:
docker PS
I can see my Jenkins container running and we actually need its logs so I’m gonna us this command:
docker logs 0ef6bb7d38fawith the container ID (your id will be different).

This is the password I’m gonna need to initialize it. So I’m gonna copy that and if I go to “localhost:8080”.

I will paste that password and it should start initializing.

So I’m going to go with the suggested plugins and this is gonna take some time to install all the plugins.

Depends on what technologies your application uses or what source management tools etc he will need different plugins for Jenkins. And I’m just gonna go with the community one suggested ones.
Later of course in Jenkins you can manage these plugins. You can delete them you can add new ones etc this is just the base.
Create First Admin User

I’m gonna create the first admin user.

I’m gonna leave it localhost.

Jenkins is ready.
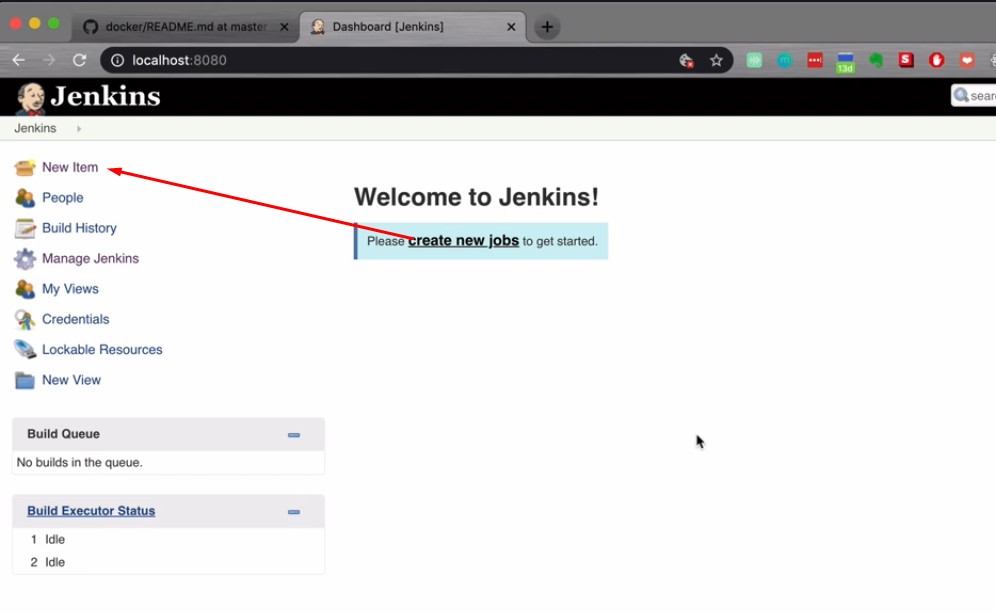
And this is view I get so if I go to new item because I installed all these plugins.

Types of Jenkins Projects

I see different types of Jenkins projects I can create but default usually have the freestyle project. Freestyle project is used for simple single tasks. Like if you want to just e.g. run tests. Whereas with pipeline you can configure the whole delivery flow like e.g. test | build | package | deploy | your application etc.
Pipeline is a more recent addition so before that they would just chain multiple freestyle projects to get a pipeline like project.
The pipeline project type is just for a single branch but in this articles we’re going to create a multi branch pipeline. which will apply to multiple branches of the same repository.

If I go to manage Jenkins that’s where you as an admin user have all the tools to configure Jenkins.

Under manage plugins you can actually add or delete or manage or update the plugins. That you have in available. I have all the plugins that I could install in addition to my Jenkins. And install I have all th ones that I have actually selected at the beginning you can remove them again.
Or you can add new plugins in the next article I’m gonna show you how to create a multi branch pipeline and how to connect it to your git repository and how to build your project using that pipeline.