


Hey everyone today we’re going to take a look at the free version of cloudflare, How to Use Cloudflare to Speed up and Secure your Website. And how you can use it to improve the security and performance of your existing website.
So i’m initially going to go over how you can set up cloudflare. And why you might want to set it up. But a little later in the article we’re going to go through some of the specific settings inside of cloudflare. And how you can configure them which will hopefully improve the security or the performance of your website.
What is Cloudflare?
So real quick what is cloudflare. Cloudflare is a cdn which is short for content delivery network and it basically caches your website. And it can serve it to your viewers from various geographical locations. So if your server is hosted in the united states for example. And someone is trying to connect to it from Europe the content is cached on cloudflare servers. Then it is delivered to the viewer in Europe using one of their servers in Europe.
So you’re basically improving the performance by reducing latency and delivering the content from a closer data server. So from a performance perspective that’s one of the benefits of cloudflare. Now they also have a ton of security related benefits and we’re going to get to that a little later.
So in summary cloudflare is a cdn that prioritizes performance and security. And it’s something that you should look to implement on your website.
If you haven’t already done so so first things first you have to purchase your domain. So there are various providers where you can purchase your domain. I use namecheap that’s not to say that you have to use them you are free to use whoever you want. But you have to make sure that your domain is purchased. Then what we’re going to do is we’re going to connect it to cloudflare.
Creating cloudflare account to speed up and secure your website
So go to cloudflare’s website and then you’re going to have to create a free account.

We’re going to add a new domain so in here i’m going to enter wondertech.xyz i just purchased this. Because it was cheap we’re going to use it for testing. But this is where you’re going to have to enter in your domain.

After that you’re going to have to select a plan so in specific we are looking at the free tier of cloudflare. That’s not to say you can’t upgrade if you want to upgrade you’re more than welcome to. We’re just going to be focusing on the free tier in this article.

After that it’s going to scan through your current domain it’s going to find any of the dns records that currently exist. So if you’re using this domain already you probably already have a bunch of dns records. If it’s new you might have some but you might not so this is just going to run through scan everything. And pull anything that it finds in. If you like to you can add a new record or you can continue on and do that later.
Cloudflare nameservers

Now the next step here is it’s gonna ask you to enter in these nameservers in step two onto your domain registrar.

So wherever you purchase your domain you’re gonna have to log into that account. Then you’re going to go to the nameserver section. And you’re going to add these two nameservers. Now this step is going to be different depending on the provider that you’re using for namecheap. I just go into the section where it shows nameservers.
I’ll enter in these two and then it’s going to save and it takes it says 24 to 48 hours. It doesn’t take that long probably takes about a half an hour.
But you should be able to use cloudflare after that so when that’s done you can select done.
Basic Settings for cloudflare to speed up and secure your website
Then you’re going to move on so now it’s going to bring you through the quick start guide. So these are a few basic settings once we finish implementing these. We’re going to dive a little deeper into cloudflare and look at some of the things you can configure.

So the first thing is automatic https rewrites so this will basically rewrite the url from http to https. And it’s something that you want to keep on.

Auto Minify is important for cloudflare to speed up and secure your website
The next thing is to always use https so we want that on as well.

We’re going to proceed from there the next thing is minify. So this is basically just going to minify the html, css or the javascript.
And it basically just takes it, it condenses it, it removes all the comments, it removes all the blank space, it’s supposed to improve performance. You are free to do this if you’d like if not you can move on. But we’re going to look at some performance stuff a little later.

The final thing is broadly compression so you can leave this on. This is basically just going to try and speed up the load times of your pages.
So that is all of the basic settings so while we went through and changed and configured some of that stuff now. You can always go back at a later time and make any additional changes that you like.
All settings for cloudflare to speed up and secure your website
So once that’s done you might get to a page that says complete your nameserver setup. The reason for this is because the nameserver changes that we made has not processed yet.

So give it some time if you refresh this page periodically. You should see at some point that cloudflare is properly set up and configured.
So we’re going to quickly go through some of these settings. But what you’re going to notice is that i’m talking in very general terms. And the reason for that is because everyone’s setup is different.
So you’re going to have to take what we’re going over today. Kind of implement it based on your needs.
DNS Section

So the first thing that we’re going to take a look at is the dns section. So similar to any other dns section that you might have used on any of the other registrars. You can come in here and manage your dns records.
So i’ll quickly talk through an “A” and cname record. Because those are most likely the two records that you’ll use the most.
A records
So an A record points back to a static ip address so if you are hosting a website out of your house for example. And your external ip address is static meaning it never changes. You’re going to come in here and you’re going to create an A record. And that’s basically saying that it’s going to point this name back to that static ip address.
So if you don’t have a static ip address you most likely have to set up ddns. And ddns basically tracks your external ip address by a domain name.
CName records

But if you come in here and you create a cname record for the name www. What it’s doing is it’s pointing the url www.wondertech.xyz back to the ddns hostname. That we put in the content section. So basically if you’re trying to host a website out of your house. For example you’re either going to create an A record that points to your external ip address. Or a cname record that points to your ddns host name.
And it’s going to tell cloudflare that that’s where it’s supposed to direct the traffic.
Proxy Status
But the last thing that we’re going to take a look at is the proxy status. So the proxy status when it has the little orange cloud it’s basically masking your ip address. Or your ddns hostname based on the A record or cname record.

So if you do an ns lookup on your domain rather than returning the ip address. Or the ddns hostname you’re going to return cloudflare servers. So no one’s going to be able to find out what your home ip address is. Or what the ddns host name that you’re using is.
Now the important thing that has to be highlighted here is if you’re trying to get a certificate. Meaning that you’re using let’s encrypt for example. You have to ensure that the proxy status is set as “dns only”.
The reason for that is so that let’s encrypt can communicate with your internal server to validate that certificate. Once the certificate has been validated and you’ve applied it. You can come in here and change the proxy status back to proxied.
So that’s really the only time you’re going to have to use dns only so that is the dns section.
SSL/TLS
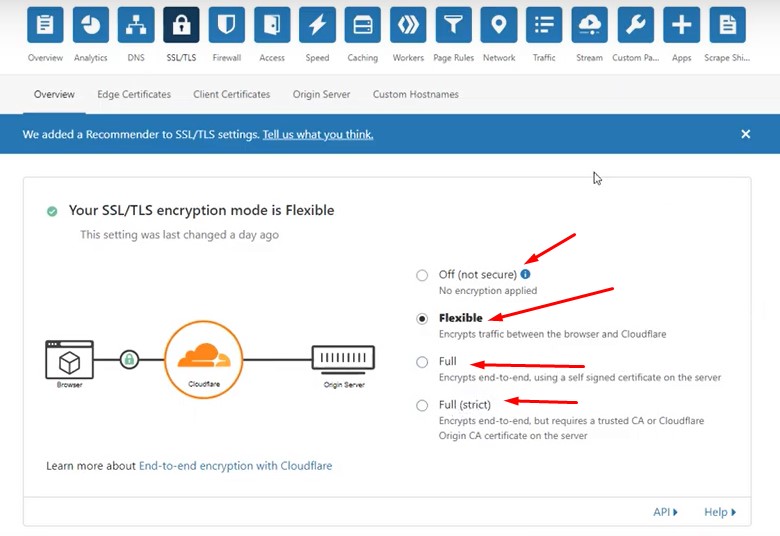
So you basically have four options you have off, flexible, full and full strict.
Off you probably should never use flexible is encrypting the traffic between the browser and cloudflare. So if you think of your users there will be a certificate that is encrypting traffic between the user and cloudflare.
But it is not encrypting traffic between your origin server and cloudflare. So that’s why for the majority of people you’ll want to use full and that encrypts traffic end to end. So basically you have the certificate that is between the user and cloudflare. Then you have a certificate between cloudflare and your origin server.
Now the full strict is pretty much the end to end traffic but it confirms that no one can bypass cloudflare. It’s basically stating that your origin server can only communicate with cloudflare and that is all done.
By using an origin certificate so the majority of people will probably want to use full here. So you’ll still have to go through and configure say let’s encrypt on your origin server. But then you’ll be able to have end to end encryption. If you want to take it a step further you can look into full strict and implementing that origin certificate.
Firewall

So the next thing that we’re going to take a look at is the firewall. The free tier of cloudflare comes with five free firewall rules. So you can implement those as you’d like. But that’s something that will probably be different for everybody.

The next thing that i want to look at is the tools section here so you should probably turn bot fight mode on here. This is basically just going to try and block any of the requests from known bots.
This actually works really well on my site very early on i was getting a lot of bot attacks. I came in here flipped this on and they completely stopped. So preemptively this is probably something that you want to keep on.
Firewall Settings

We’re now going to look at the settings and you can adjust your security level here. So the security level is what will determine if your visitors receive a challenge or not. Basically this is the way that you can protect yourself against ddos attacks.
So if your page is being attacked you can come in here on the security level section and put i’m under attack. And what it’s going to do is it’s going to challenge every single user that tries to connect to your page. From there with the logs you should be able to try and figure out exactly where the attack is coming from.
And try and neutralize it but in the short term you can turn that on. It will protect your site. The default setting here is medium and i normally leave that on as medium. But if you’d like to lower it or raise it a little you’re free to do that.
The next three settings i usually leave as default. But if you’d like to increase the challenge duration you’re free to do that. So that is basically all of the security settings. They tremendously help so it’s something that you should definitely take a look at early on.
Make sure it’s configured properly and then monitor it periodically moving forward.
Speed Section for cloudflare to speed up and secure your website

We’re now going to take a look at speed and caching and this is going to hopefully help the performance of your web page.

So under the speed section and optimization we’re going to go through some of these settings now. So the auto minify and broadly we took a look at initially. If you’d like to change any of that you could do that now.

But at the bottom here we have rocket loader you can turn this on. If you like it’s basically just going to improve the performance on pages that include javascript. If you don’t have much javascript you don’t have to turn this on. But like i said earlier these are all mostly personal preferences based on the way that your site is designed.
Cache Section

Heading over to the caching section you can select configuration. And this is what’s going to determine how your site is cached. So like i said earlier cloudflare is a cdn so what it does is it caches the static assets of your website. And it stores them and it tries to deliver them from a data center that is closer to the user. Rather than having them connect back to your local server.
So the caching level is actually very important here and generally i leave this as standard.

And then the browser cache you have to kind of determine this based on the amount of changes that you implement .
So i can’t really give advice for this but you can either leave it at a few hours or even a few months if you like. It’s also important to highlight that you can come in here and you can purge your cache at any time.
So if you like to clear out all the cloudflare cache you can do that here. Or if you’d like to purge it for individual pages you can do that as well.
Always Online & Development Mode

Now at the bottom there’s two settings here that you should take a look at you have always online and development mode. So always online will try and keep your website up. If the origin server is unavailable so if your local server goes down for whatever reason it will try and keep your page online as long as it can.
By using the cached versions development mode will temporarily bypass the cache. And it’s going to allow you to see the changes in real time. So if you’re making any major changes to your site any development especially for a development server or whatever it is.
You should probably leave this on so that you’re seeing the changes in real time. Just make sure that when you’re done you come back here and flip this back to off.
Page Rules

So the last thing that we’re going to take a look at is page rules. So by default you have three free page rules. That you can implement so that could be something like forwarding all of your traffic from one url to another.
It could be something like caching your entire page so this takes the cache and kind of built on top of it. Takes it one step further and it will cache every single individual page.
Which can greatly improve performance so similar to the firewall rules i can’t tell you what you should be putting here.
But based on your individual needs you can create page rules if you’d like. So the rest of the settings here i generally leave as default.
Final wording about cloudflare to speed up and secure your website
You’re going to notice that we didn’t go through everything. But for your own site you might want to go through everything. But these are what i consider to be the most important points to increase the performance. And security of your website so the majority of the benefits here will be. If you’re hosting something like a wordpress website either out of your house. Or even in the cloud somewhere you could
always put cloudflare in front of it.
But that’s not to say that you can’t use cloudflare for your own home services as well cloudflare offers a lot of functionality for free. They do have paid tiers and you can always look to upgrade in the future if you’d like.
If you want to learn more you can visit our blog page.


